|
Load Microsoft Word. To do this, while in
Windows 95, locate the following icon from the start-programs menu:  . Next, click on this icon and Microsoft Word will load.
Entering Text
You will get a blank white screen with a blinking cursor as well as
a menu on the top of your screen. The white area on the screen is where
you type in your text. Go ahead now and type in a few words. You'll see
them appear. That is your text.
Editing,
Spell Checking, or Revising Text
To edit your text, do the following:
First, type in a working sample: "the fox jumped over the lazi dog."
Notice that the word lazi is misspelled. Underneath the misspelled
word appears a red squiggle, which indicates that this word is misspelled.
Also notice, that the "t" in the word "the" was automatically capitalized
by Microsoft Word. There are several ways to correct misspellings
in your text.
a. Individual Words To correct the word "lazi",
move the cursor after the letter "i" in that word by pushing the arrow
keys on your keyboard. Each time you press that key, the cursor moves one
space in the direction indicated. Now, press the backspace key on your
keyboard, which is located usually above the enter or return key on your
keyboard. The "i" is gone. Now type in "y". You have corrected the misspelled
word.
b. Individual Words Another way to correct misspelled words
is by doing the following: Move your cursor over the misspelled
word ("lazi") and click the right mouse button. You'll get a screen with
a list of alternate spellings. Click on the correct spelling ("lazy") with
the left mouse button. The misspelled word "lazi" will now change to the
word "lazy". The other choices that were present were alternate matches
that most resemble the word misspelled word.
c. Spell Check Entire Document Click on the ABC
icon on the Toolbar (or click on Tools from the menu bar,
and then choose Spelling) and then follow the directions provided.
A Spelling dialog box appears showing the first word identified as misspelled
in the document. After you correct that word, the program moves on
to the next misspelled word. (Windows 97 also includes a grammer
check that points out problems of syntax, verb agreement, and other important
components of correct English usage.
Changing the
appearance of words is also easy in Microsoft
Word 97.
To do this, we will first highlight the entire line we want to change
by depressing the left mouse button and dragging it across the text we
want to change. Now we can manipulate the appearance of the text.
Here are some of the things that can be changed: italicize, bold,
center, right or left justify, underline, change the size of the type,
change font style.
Highlighting
As a working example, use the sentence above "The fox jumped over the
lazy dog."
Place your mouse after the letter "g" in the word dog. Click on the
left button of your mouse and don't let go of the mouse button. Now, while
still holding down on the mouse's button, drag the mouse to the left until
you reach and pass the "T" in the word "The". You will notice that the
words will turn black.
Bolding
 Now, release the mouse button and move the
mouse pointer over the "B" (Bold)button on the menu at the top of
the screen Now, release the mouse button and move the
mouse pointer over the "B" (Bold)button on the menu at the top of
the screen  . The sentence will look as follows
now: . The sentence will look as follows
now:
 To get rid of the black highlight, click on
any white portion of the screen, other than where the text is located.
The sentence is now boldface and will look as follows: To get rid of the black highlight, click on
any white portion of the screen, other than where the text is located.
The sentence is now boldface and will look as follows:
The fox jumped over the lazy dog
Italicizing and Underlining
Follow the same procedures as with bolding. Highlight the section
of text that you want to italicize or underline and then click on the I
button
or U button next to the Bold button. You can apply all three functions
or any combination to your highlighted text. To reverse the process
just click on the appropriate button and this will remove the bold, italicized
or underlined text. To rid your text of the highlight, click on any
non-text white portion of the screen.
Centering
Text
To center a line of text, word or title, highlight the text and then
click on the  button at the top of the screen.
(An entire paragraph can be centered by just clicking on this button and
not highlighting the text.) . button at the top of the screen.
(An entire paragraph can be centered by just clicking on this button and
not highlighting the text.) .
Right Justifying and Left Justifying
Text
To line up all text along the right or left margin
is called right or left justifying. Academic papers, books, and articles
are commonly left-justified. Newspaper articles are usually left
and right justified. Academic papers are normally left justified
with uneven right borders.
To right justify text, highlight the affected portion and click on
the  button. To return the line to
the left, click on the button. To return the line to
the left, click on the  button. button.
Double
Spacing
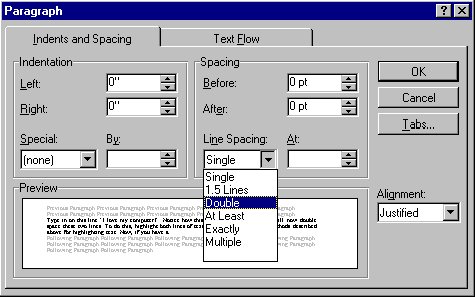
Academic papers are normally double spaced. Instructors will specifiy
if some other spacing between lines is required. To double space
text in a paper, click on the word "Format" at the top of your screen.
When the menu appears, scroll down and click on the word "paragraph." When
the "Line Spacing" menu appears as below, click on the down arrow after
the word "Single". You will get a list of spacing options. Click on and
highlight "Double" to select double spacing. Click on "OK" from the menu
and you will return to your text, and it will be double spaced (look at
picture below).
Saving Text
To save text on your hard drive or floppy disk, click on the File menu
and scroll down to the word "Save" and click on it. Do the following to
save your document, as shown in the picture below.
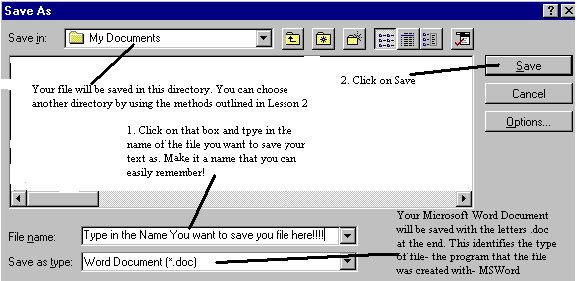
Be certain to save your text about every 15 minutes when working on
a longer document since power failures or network glitches can eliminate
those wonderful papers that you have been working on for hours. Once
you begin a document, of course, you can save it and return later to continue
working on it. When you save your document a second time you can
use the "Save As" command so that you don't have to rename it each time.
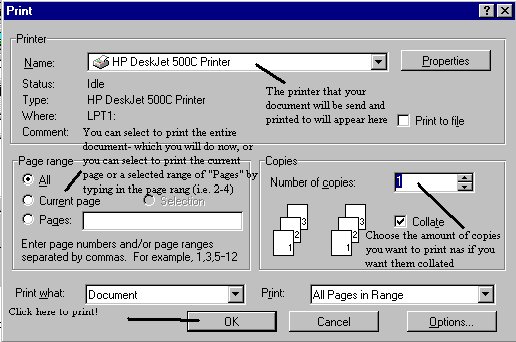
Printing
To print your document (after completing, revising, editing, spell checking,
formating),
click on "File" at the top of the screen. Scroll down and click on
the word "Print.".
Do as the following picture explains (You need a printer attached to
your computer to do the following!):
Opening
A File
To open a file you have saved on disk or your
computer's hard drive, click on File, then on Open in the
pop-up menu. Next you have to indicate where your file is located
by clicking on your C drive or A drive for floppy disks. When you
have completed this, click on the needed file.
Advanced Functions of Word 97
Cutting
and Pasting
We can cut a portion of our text from a paragraph or sentence and then
paste that portion that we cut into another paragraph or document. We do
this as follows:
-
Type in your text- for example, type in "The computer industry has revolutionized
the world and nation. As fast it came it keeps on revolutionizing itself.
The limits of the computer industry are limitless as the industry continually
pushes itself forward to a better technological state as we all enter the
next century. This revolution knows no boundaries."
-
Now indent your paragraph before the word "The" in the first sentence.
-
We will now cut the last sentence from our paragraph and place it as the
third sentence in the paragraph instead of the fourth sentence. We'll do
this in our case since this sentence would sound better as the third sentence
rather than the fourth sentence. First, move your cursor before the word
"This" in the last sentence and highlight the last sentence. The last sentence
looks as follows-

-
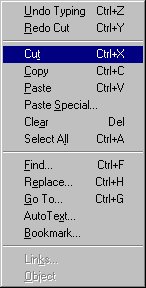
Now go to the Edit menu at the top of your screen and click on "Copy".
This will place the highlighted portion of your text into memory so it
will be saved and available to paste later.
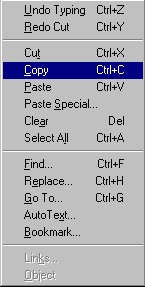
-
Now go to the edit menu again and click on the word "Cut" to delete the
sentence.
Your paragraph will now look as follows:

6. Now move your cursor to the position you want to paste the text at-
that is before the letter "T" in the word "The" in the third sentence.

Now press paste from the edit menu and your paragraph will look as follows:

7. You have just pasted your text in the correct position that it belongs.
If you have no space between the last word of the second sentence "itself."
and the word "This", then push the space bar after the period proceding
the word "itself". If there is no space between the word "boundaries."
and the word "The" of the last sentence than push the space bar proceeding
the word "boundaries.".
We will now learn a few useful tools of Microsoft Word. Right now your
cursor should be in the middle of the page. Say we wanted to move to the
first letter on that line, then you should press the "Home" key on the
right side of your keyboard. If you want to move to the last letter on
the line, then push the "End" key. If you had a multi-paged document and
wanted to jump from one page to another, you would use the "Page up" or
"Page down" buttons.
To access the menu above the screen- the menu with the words "File,
Edit, View, etc.�" you can either use your mouse as you've been doing,
or another way is to press the "Alt" key to the right or left of your space
bar and press the underlined letter of the portion of the menu that you
wish to access. For example, to access the File menu, notice how the letter
"F" is underlined on the menu as show below:

Now press Alt and then the letter "F" on your keyboard. The menu will
then appear.
Another tool to use before printing is called "Print Preview". Go to
the File menu and click on the word "Print Preview"

or else you can click on the Print Preview button at the top of your
screen which looks as follows: 
You will then get the following screen:
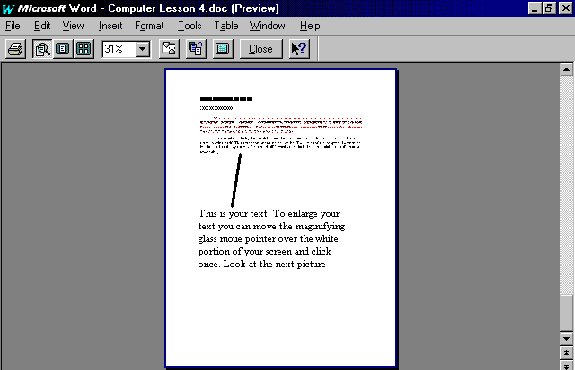
To enlarge your text, click on any white portion of the screen. You'll
get the following screen:
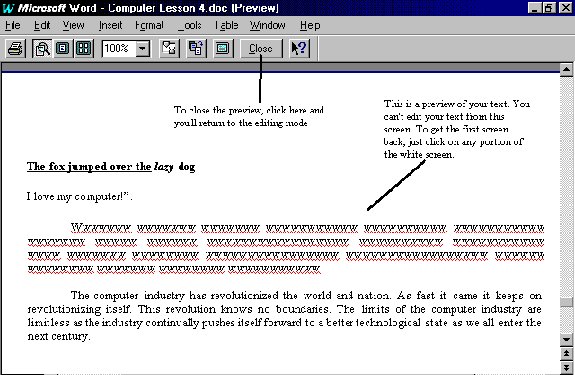
To close the preview and return to editing, click on the close button.
To return to the previous overview of the page, click again on any white
portion of the screen.
Once you have returned to the editing screen, save your document by
going to file and choosing save. Notice how you didn't have to retype the
file name. If you wanted to rename your file, then you can choose "Save
As" which will allow you to rename the file.
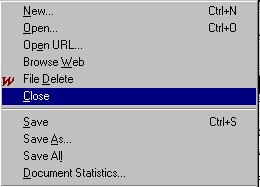
After saving your document, we will now learn how to close the document
without exiting Microsoft Word. Go to File and click on Close.
Page
Breaks
We will now learn how to insert page breaks and page numbers.
A page break automatically starts you off on a new page, even if you're
in the middle of a page of text. To do this, place the cursor on a new
line. This line should be proceeding the last line of the page, so that
all the text typed on the line that you're cursor is located on will be
on the new page. Then go to the "Insert" menu and choose "Break"
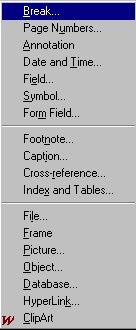
Then choose "Page Break", which is normally already chosen for you.
Then press "OK"
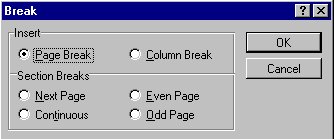
You will then notice the following horizontal line appear on your screen.

You have inserted a page break. To delete the page break, you can bring
the cursor after the page break line and press backspace.
Page
Numbers
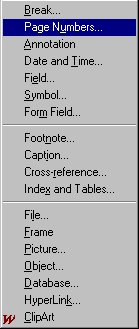
To insert page numbers, go to the "Insert" menu and choose "Page Numbers"
Then you'll get the following screen:
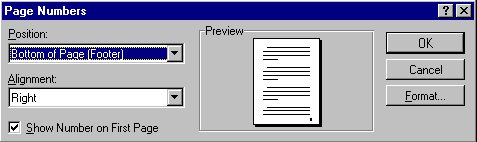
Choose the options you want:
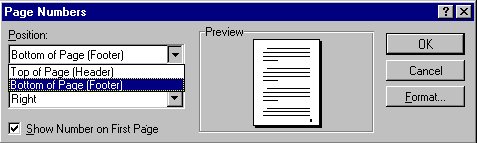

Press "OK" and the page numbers will be inserted. To view the page numbers
and the effect of any page breaks, you need to use print preview.
Getting
Help
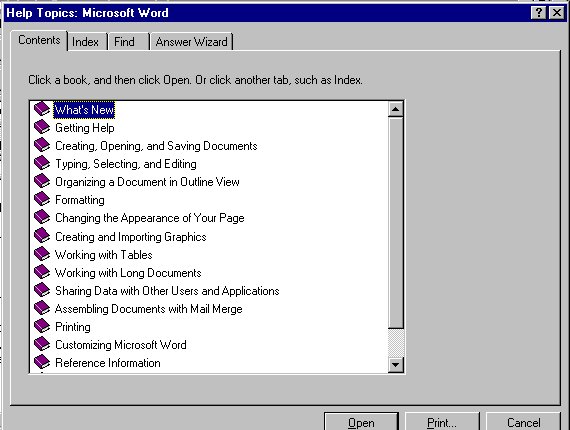
We have now learned a large portion of Microsoft Word. If you need any
additional help, go to the "Help" menu

Click on "Microsoft Word Help Topics". From the menu that will then
appear, choose "Contents" and double click on any one of the help books
to learn more about one of those topics, just like what you did for QuickTutor
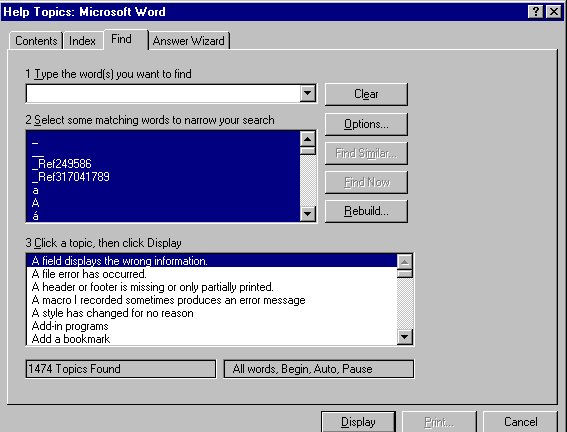
You can also choose "Find" and type in any keywords that you are interested
in and the computer will give you a list of matching topics. You then must
choose one of those topics and you will be given a help screen with the
information you requested.
Another new and helpful feature of Microsoft Word is "Answer Wizard".
Here, you can type in the question you are interested in and the computer
will give you the topics that match your question and thereby your answer.
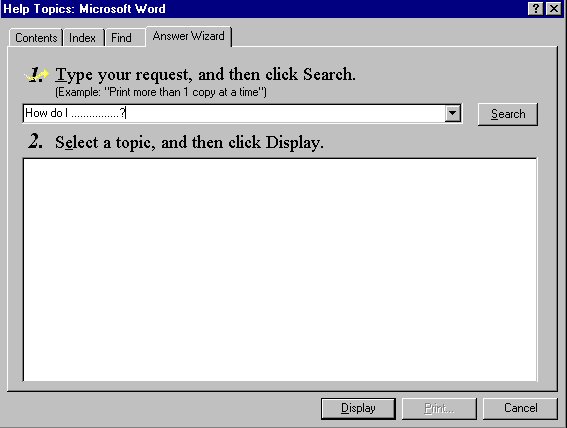
You should use any of these help forms for any other information that
you might need further down the line during your word-processing.
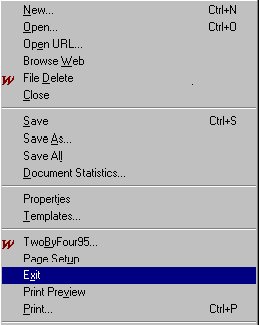
You can now exit Microsoft Word using the File-Exit method.
You will then return to the Microsoft Windows 95 Main screen/desktop. |
![[ Home ]](home1.gif)
![[ Introduction ]](intro1.gif)
![[ The Web ]](web1.gif)
![[ HTML ]](html1.gif)
![[ Bookmarks ]](links1.gif)
![[ Word ]](word1.gif)
![[ Excel ]](excel1.gif)
![[ Access ]](access1.gif)
![[ Tori Amos ]](tori1.gif)
![[ Robert Heinlein ]](heinlein1.gif)
![[ Jeff ]](jeff1.gif)